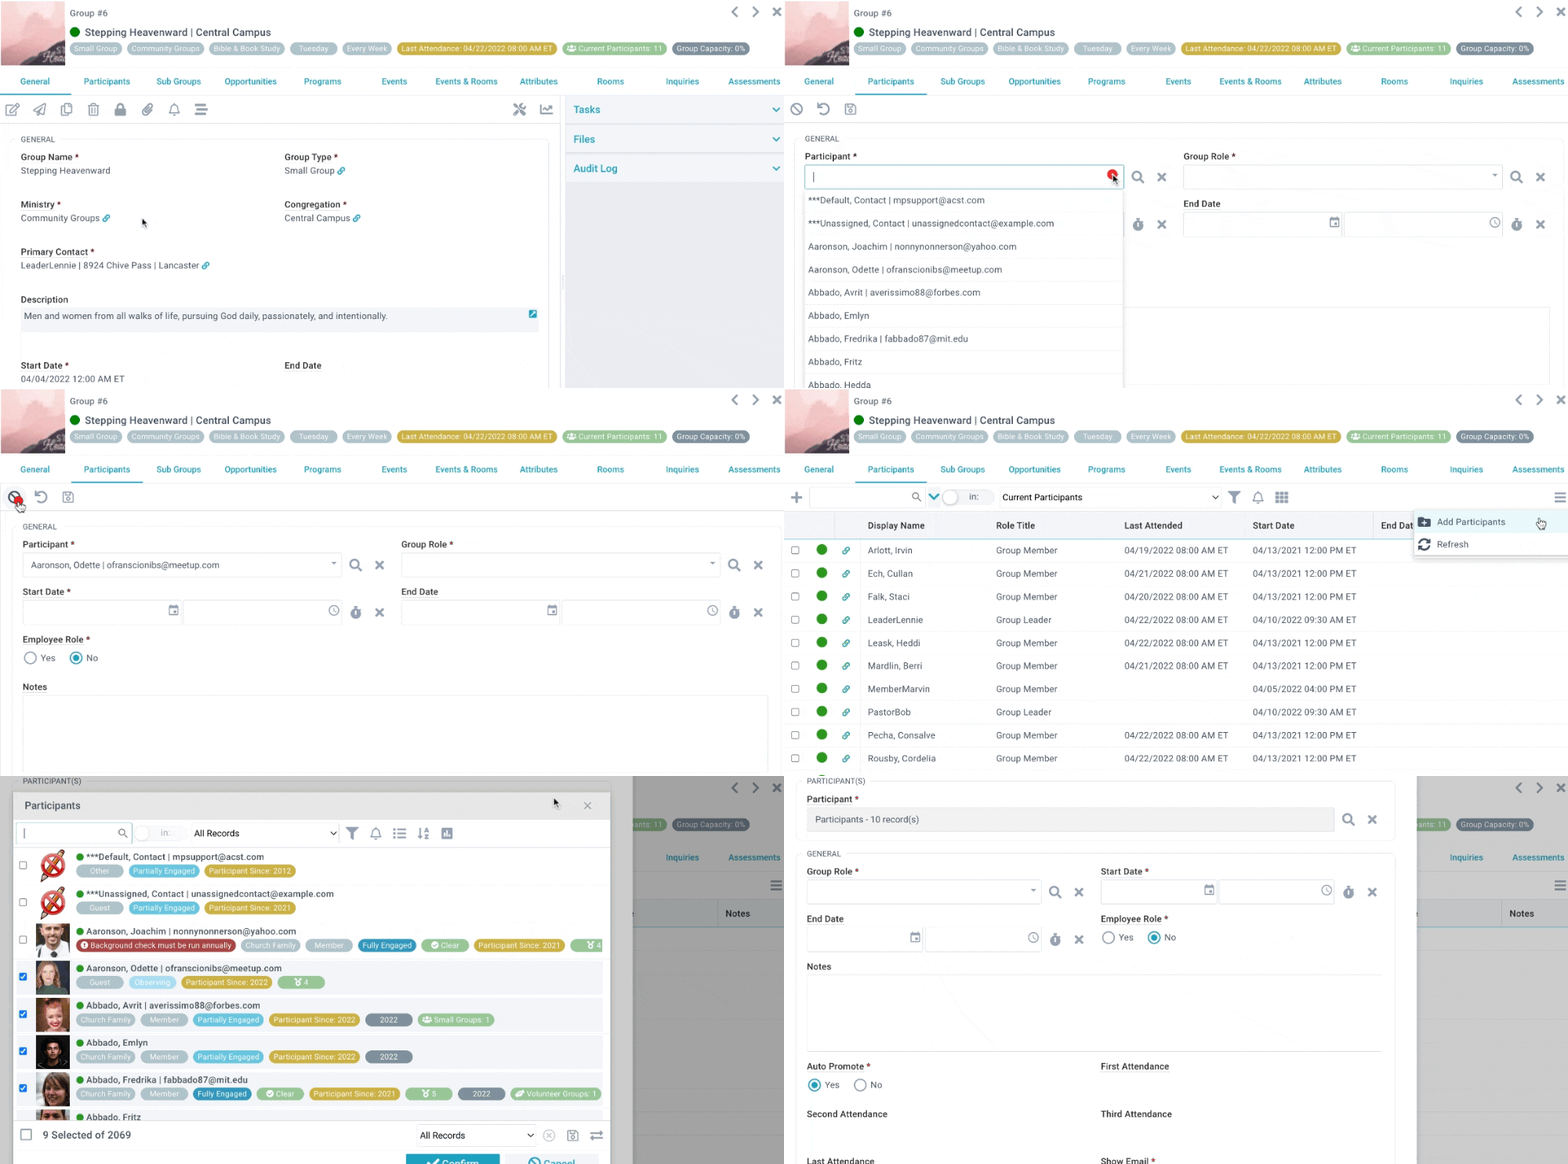
There are multiple ways to add individuals to Groups.

From the Group record on the Groups page
- Open the Group record, and click the Participants Tab.
- To add one person, click New Group Participant.
- To add multiple people with the same Start Date and Group Role:
- Click the Actions menu, and select Add Participants.
- Choose your Participants or selection of Participants.
- Click Add.
- Save.
Note: There is a field called Employee Role that defaults to No/False. This field was created early in MP history and has not been used for anything meaningful.
From the Participant record on the Participants page
Open the Participant record, and click the Groups tab.
To add one Group, click New Group Participant.
To add multiple Groups with the same Start Date and Group Role:
Click the Actions menu, and select Add Groups.
Choose your Groups or selection of Groups.
Click Add.
Save.
From Check-in Suite
With the kiosk in Attended Mode, search for and locate a family.
Click Edit Family > Next, then locate the record of the individual.
Select the event from Add to Activity.
Select the group from Add to Group.
This is an insert-only option:
Groups are listed if they are directly associated with the Event.
Groups may also be listed if they are associated with the Program to which the event belongs and Ignore Program Groups is set to No.
The current date is used and the default Group Role found on the Group Type record is used.
From the My Groups widget
A group leader can open the My Groups widget on the website.
Once they log in, they can click the GroupLife button on their group (as long as the Group record has Available Online set to Yes).
Click the Menu, then click Add Member.
Enter the individual's information, along with the date they started with the group.
Click Save.
From the Group Finder widget
Any person who finds a group through the Group_Finder.aspx page can click "Sign Up For This Group".
The individual must sign in (if they have not already done so), and select their contact or a blank form.
If they selected a blank form, they enter their name, email address, and phone number.
They can enter an optional message to the leader.
Click Sign Up.
Based on a Custom Form response
On the All Form Answers page, search for a specific Form Title, Field Label, and Response (e.g., people who responded "2nd Grade" to the "What grade are you going into?" question on the VBS form).
Select the desired records.
Change Selection to Current/Unsaved Selection.
Option: Copy to Another Page.
Target Page: Participants.
New Selection Name: Indicate desired name (e.g., "VBS 2nd Grade").
On the Groups page, search for and open the desired Group.
On the Participants tab, click the Actions menu.
Click New Group Participant.
Choose the Selection you made above.
Confirm the Selection, indicate other information as needed, and click Save.
Based on an Event participation
On the Event Participants page, search for a specific Event Title and Date (e.g., the people who attended "Singles Coffee" on 1/23/2023).
Select desired records.
Change Selection to Current/Unsaved Selection.
Option: Copy to Another Page.
Target Page: Participants.
New Selection Name: Indicate desired name (e.g., "Singles Coffee").
On the Groups page, search for and open the desired Group.
On the Participants tab, click the Actions menu.
Click New Group Participant.
Choose the Selection you made above.
Confirm the Selection, indicate other information as needed, and click Save.
During Event Registration via an Option Price
- When creating an Option Price for your event registration, populate the Add to Group field with the desired Group.
- The registrant is automatically added to the Group if:
- The Participant does not already exist in the Group, a Group Participant record is created with a start date of the date registered and no end date. They will be added with the Default Group Role assigned to the Group's Group Type.
- The Participant exists but with a past End Date, a new Group Participant record is created with a start date of the date registered and no end date.
- The registration will not be added to the Group if:
- The Participant is already a current Group participant, they won't be added.
- The Participant already exists in the Group but has a future End Date, they won't be added.
Managing Mishaps
If you forgot to clear your selection when adding people to a Group and now the wrong people in a Group, you can delete the Group Participant records. Note that deleting Group Participant records should only happen when the person shouldn't have been added to the Group in the first place - not if the person participated in the Group and is now just no longer participating. (In the latter case, we recommend simply end-dating participants.)
If you truly need to delete Group Participants, there you two options; either method deletes the Group Participants records without deleting the Participants or the Groups themselves (just the connection between them). As always, be cautious when using the Delete action. (Don't have the Delete option available? A SPoC can update your Security Role as needed.)
Option 1: Go to the Groups page, open the desired Group and go to the Participant sub-page. Select the Participants to remove and click Delete.
Option 2: Go to People Lists > Group Participants, select the records to remove, and click Delete.

