Make sure you have a supported check scanner connected to your computer and the Scanning Service installed. You may scan checks and/or envelopes.
Important! To install the Batch Manager Scanning Service, the User must be logged into their workstation as a local administrator. However, a User does not have to be a local administrator to use the Scanning Service to scan checks from the Batch Manager Tool.
Scanning
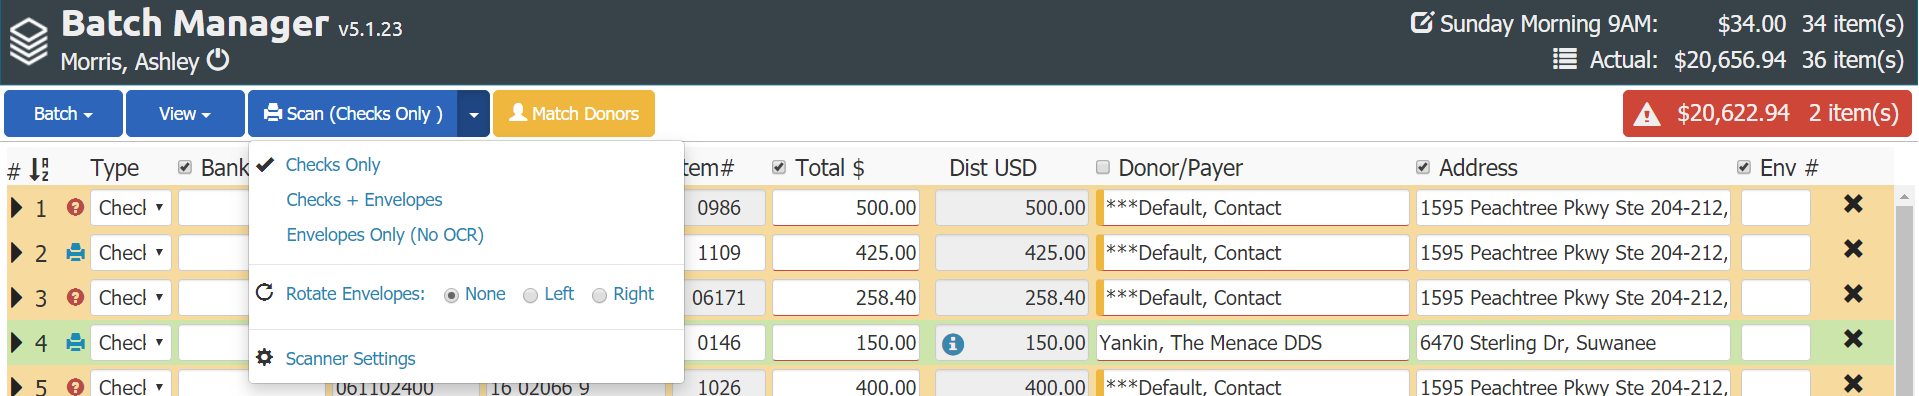
Scan Options
- Checks Only: This is the default and should be used if you have one document (check) per image that benefits from being read using OCR. The front and back of the check will be captured.
- Checks + Envelope: This should be used when you are scanning two documents (check + envelope) for each donation record. Place the two documents consecutively in the check scanner hopper (check, then envelope). Only the first item scanned (check) will be read using OCR. The front and back of the check and the front and back of the envelope will be captured.
- Envelopes Only (No OCR): This should be used when you are scanning an envelope or other supporting documents that do not need to be read using OCR.
- Rotate Envelopes: This will rotate the envelope image for portrait-oriented envelopes. The default is none; left and right rotation options are available. Images are rotated when saved (not just visually). This setting applies to all envelopes scanned in the scan session (Batches with varying orientations should scan each orientation separately into the Batch).
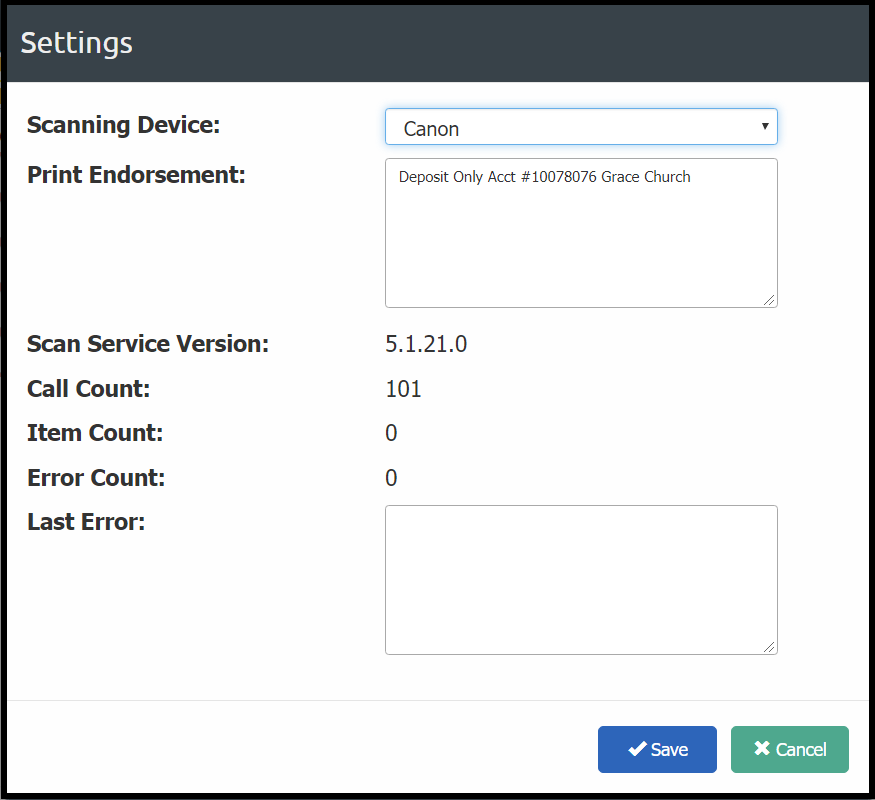
- Scanner Settings: This will open the Scanner Setting dialog to allow you to change devices and see scanner statistics - including version and errors.
Start Scanning
- Load the documents in the scanner.
- Select the desired scan option.
- Click Scan.
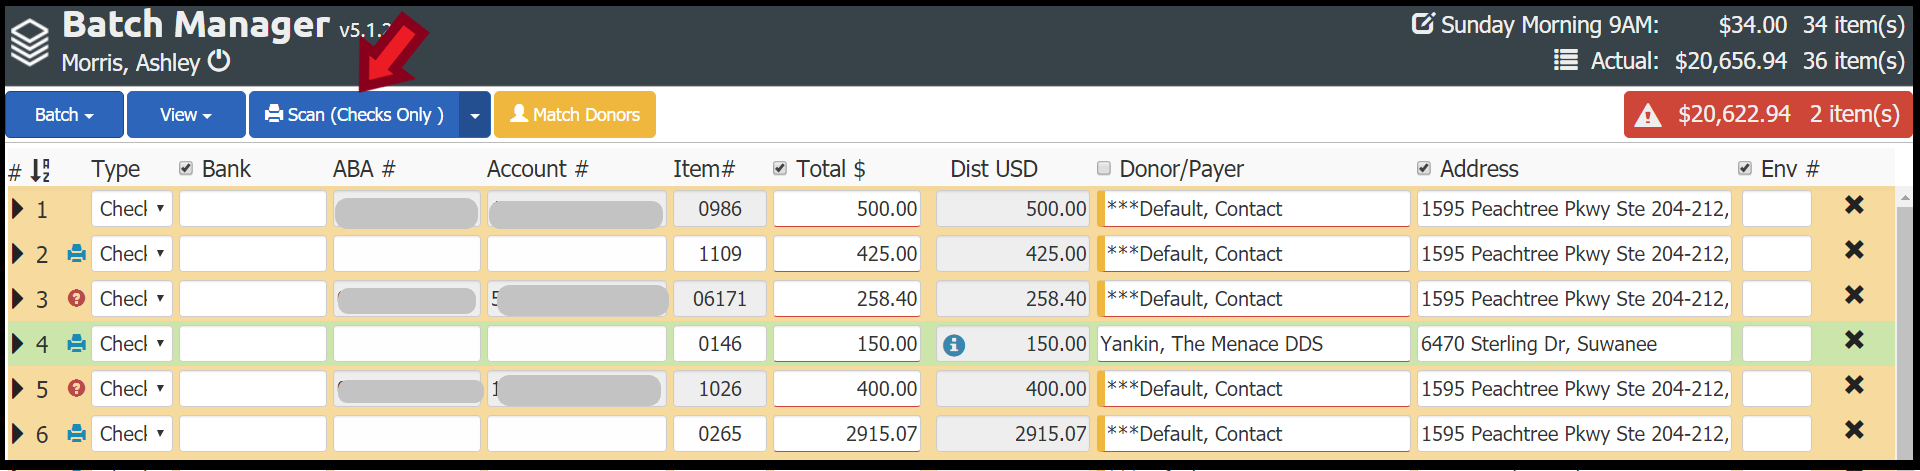
- A Donation record is added to the Batch for each check-in the order scanned.
- Note: The BMT will flag a potential mismatch between the written check amount (LAR) and the printed amount (CAR) with a dollar sign in a red circle 🔴 . Don't be alarmed, but do confirm the amount.
Scan Status
As you scan checks, you will see the following status updates in the status bar:
- Scanning Checks // Other BMT buttons are disabled, and checks are being scanned.
- Processing Donations // Other BMT buttons are disabled, and Donation records are being created.
- Saving Images // You may begin to edit the Batch while images save.
*Important* Don't close or refresh the BMT while this status bar is visible or data will be lost. If you attempt to close the browser before completed, you will be warned.
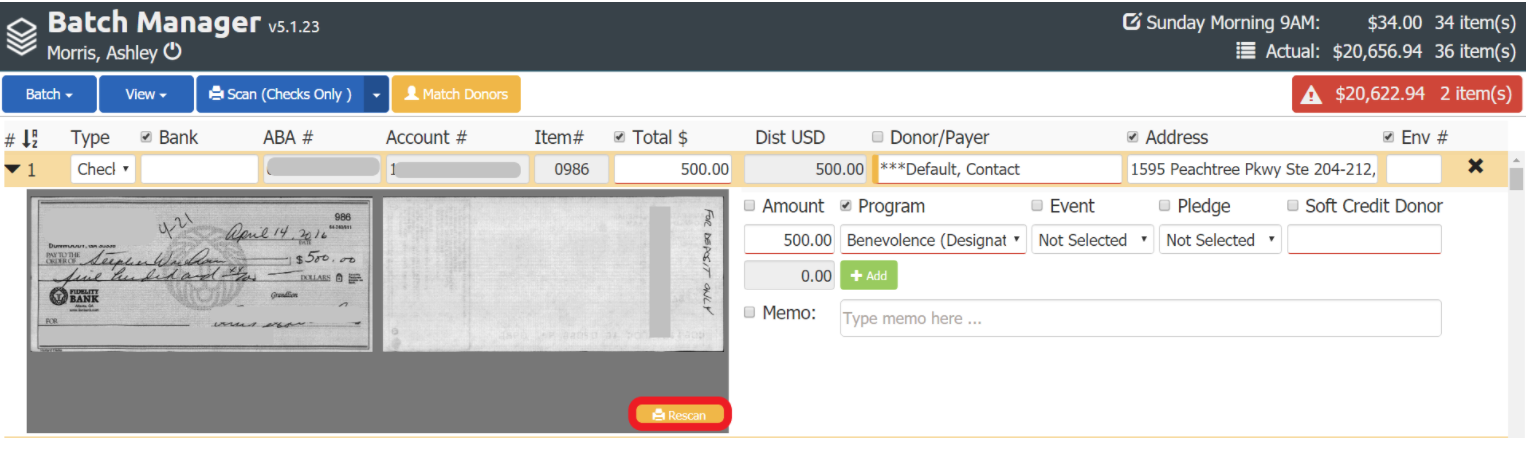
Re-Scan
To re-scan, on the desired Donation row:
- Click the Scan icon next to the desired Donation row (if available, see MICR details below), OR
- Click Show All. Then, click Rescan.
The scanner scans again based on your set scan options (above). For Checks + Envelope, you need to rescan the "set" - both the check and the envelope. For checks, a rescan will include the reading of the check's MICR and perform OCR.
Physical Endorsement
The Batch Manager Scan Service has the capability to physically endorse checks if the supported scanner has print capabilities and is loaded with a compatible ink cartridge. See the Supported Scanners article, for the full list of supported models. Currently, Canon, Digital Check, and Epson models with print capabilities are supported.
To Configure Physical Endorsement within the Batch Manager Tool:
- Visit Scanner Settings beneath the Scan drop-down menu.
- Specify the desired text to be printed in the Print Endorsement field under Scanner Settings.
- When Print Endorsement is null, no endorsement is added.
- Endorsement text may contain spaces, must not exceed 30 characters, and is limited to one line of text (no carriage returns).
Endorsement text precedes image capture thus making endorsement visible on image Check_Back.
Note: Franking with Espons scanners is not editable. Adding any text to the physical endorsement field in Scanner Settings will enable ‘franking' and add "ELECTRONICALLY PRESENTED" to the front of the check.
Scanned Images
- After scanning, Batch Manager Tool shows all Donation row expanded so that the scanned images are visible. You can "hide" the images, by clicking the - (top left-hand corner) to collapse the Donation rows.
- The Front image is displayed filling the image window.
- To zoom in click Zoom In. Use your mouse to pan or drag to another portion of the zoomed image.
- To view other images, click Show All or double-click the image window.
- From the Show All screen, double click any image to expand to full screen.
- The Front image will zoom into various sections/corners of the check when your cursor is placed in the corresponding field (address, amount, etc.).
- Scanned images are saved in the Platform as an attached file on the corresponding Donation record. Images are named "Check_Front", "Check_Back", "Envelope_Front", and "Envelope_Back" respectively.
- The MICR read by the scanner is saved in the Original MICR field on the corresponding Donation record. Edits to the MICR in the BMT update this field in the Platform.
- Currently, the BMT scanning functionality does not include Mod 10 functionality or the exclusion of foreign ineligible items.
- If the check jams/misfeeds, the BMT will give an error. If the MICR is not captured, the BMT will give an error. However, if it is folded to cover a number, but scans without a jam/misfeed and the MICR was able to otherwise be captured, no error will be generated. A quick visual review of the Batch is recommended before finalizing.
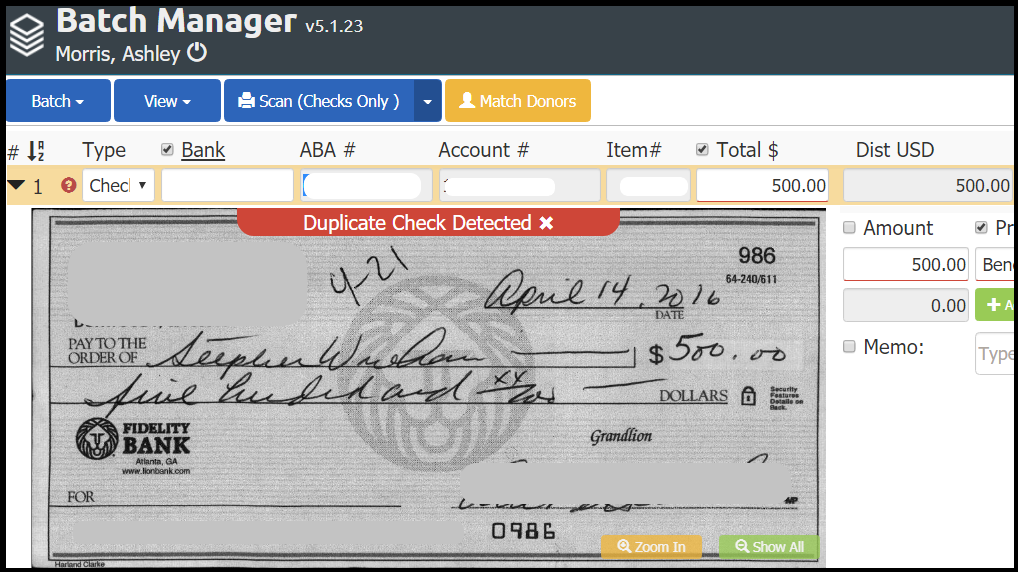
Duplicate Checks
For Donations with a Payment Type of Check:
- If the BMT detects that a check has been scanned more than once a warning flag will be displayed.
- Flagged donation should then be reviewed to remove from the batch or dismiss the warning.
- To remove from the batch, simply click the X at the end of the Donation row.
- To dismiss the warning, simply click the X in the "Duplicate Check Detected" banner message overlaid on the check image.
- Duplicates are:
- Either duplicated in the current batch
- Or, scanned into any previous batch
- Duplicates are determined by comparing across all MP Donations with MICR data (not User or Date specific) and a Payment Type of Check.
Scanned Checks with Missing Details
Missing Images
If you have a check or envelope that was scanned in the BMT that is missing an expected image, it will be indicated by turning the row red (preventing the Batch from being finalized) and adding: "Warning! Missing image!" indicator where the expected image should have been. To resolve, follow the Re-Scan steps outlined above.
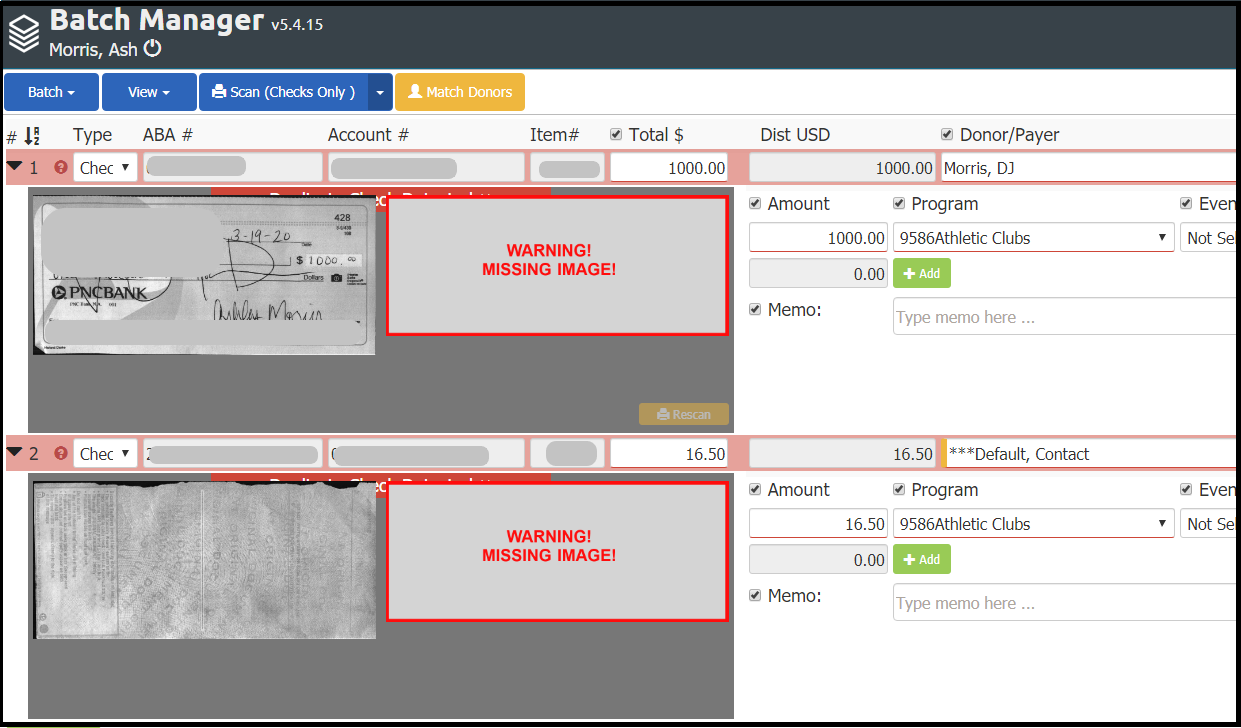
The number of expected images is based on the Scan options selected:
- Checks Only: 2 images.
- Checks + Envelope: 4 images.
- Envelopes Only: 2 images.
Invalid MICR Characters (Edit MICR Data)
If you have a check where the Batch Manager Tool reads a MICR number with invalid characters (e.g. letters or symbols), a Donor will not be matched. If this occurs, you will see the Account and/or ABA fields are blank indicating that there is a problem. To correct:
- Load the check-in scanner.
- Click the Rescan icon next to the Donation row.
- If the MICR is still not read, click the Account and/or ABA field to open the Edit MICR Data dialog.
- Review the check image.
- Set where the Item Number is located (default is Last/None, other options are First and Middle). Tip: Use the check symbols images in the Edit MICR dialog to help you determine what numbers go where.
- Enter the account, routing, and item numbers from the check.
- Click Save.
- If the data entered is still not valid/correct, rescan or re-open the Edit MICR Data dialog as needed.
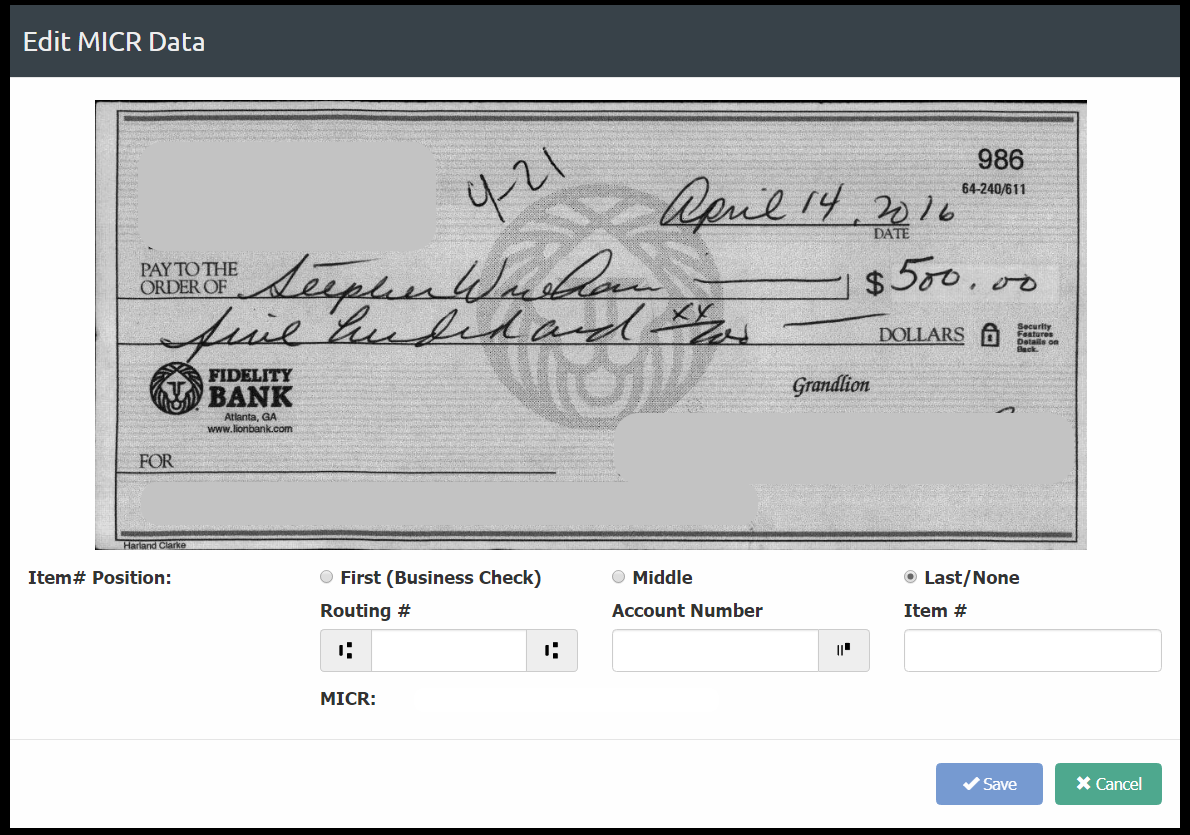
If needed, click Match Donors to assign the Donor. Note: If this issue with an Account and/or ABA field is not corrected before the Batch is closed for the first time after scanning, no (blank) value will be saved in these fields. When you re-open the Batch, choose an option for assigning the Donor, if needed.
The Edit MICR dialog only applies to Donations with a Payment Type of Check. Routing and account number fields are read-only except via the Edit MICR dialog. Any other Payment Types have editable Item Numbers that allow for non-numeric values.
Unread or Misplaced MICR Values
If you have a check where the Batch Manager Tool does not read the Item Number, Account Number, and/or Routing Number or puts it in the wrong field, it most likely is due to the formatting of the MICR (no spaces, too many spaces, extra symbols, etc.). Often times if this happens, it always happens for a particular Bank or check stock. We can adjust the Batch Manager Tool to read this style of check to save you time. In order to report a check to us to be addressed in a future update, a SPoC can contact Support with the following details:
- The URL link to the Donation record from the Platform, and
- An image of the check.
