Your Knowledge Base is moving on 3/25/24! Our new Help Center provides all the articles you know and love (plus so much more) in a one-stop shop. Ask your SPoC for details!
The Form Editor Tool is your go-to functionality for creating and editing Custom Forms, including both standalone Forms and Forms for Events, Opportunities, or Mission Trips.
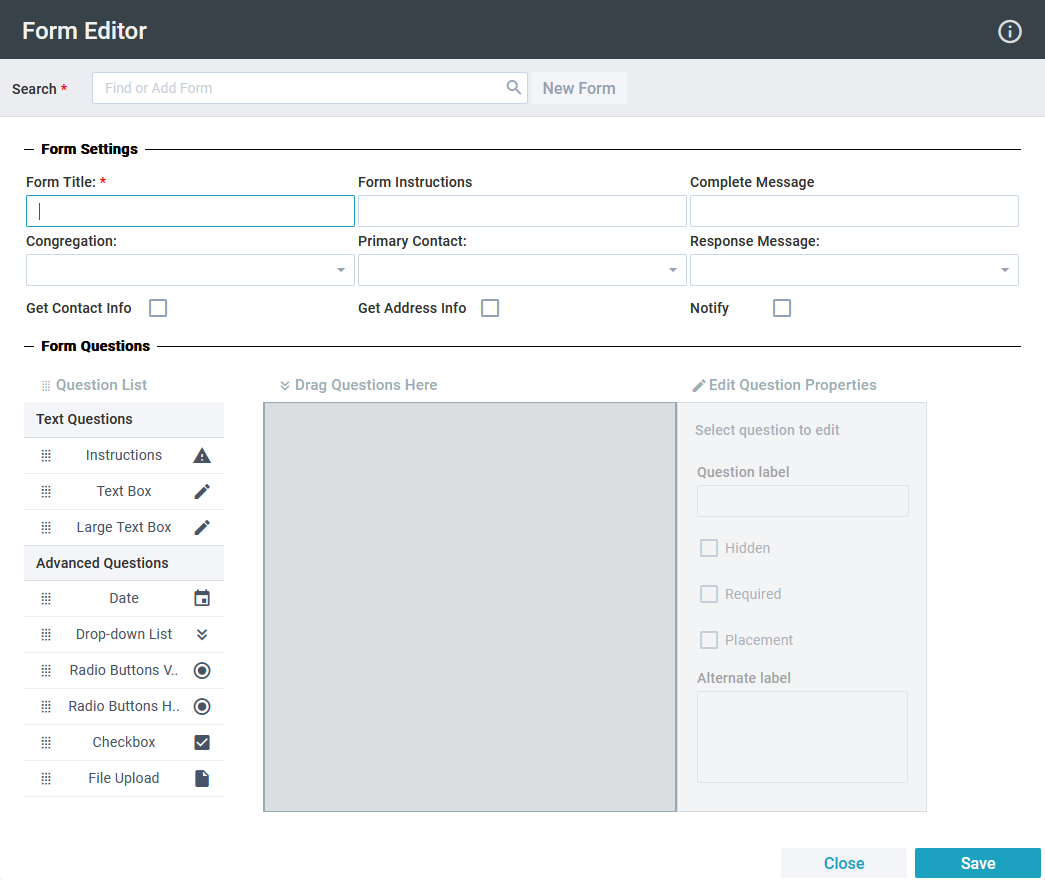
This single-screen tool allows you to add, edit, and rearrange form fields, field options, and drop-downs.
Changes made with the Form Editor Tool are recorded in the Audit Log of the Form record.
Note that this Tool is not designed for use on mobile devices and will not be available in mobile environments.
SPoCs can grant access to this tool via the normal process.
Using the Form Editor Tool
From the Forms page, launch the tool by either:
Open the Form record > Tools > Form Editor, OR
Tools > Form Editor > Search for the Form you want:
Search results (if available) display after 3 characters and update as you continue to type.
If no match is found, select "New Form".
Under Form Settings, add or edit the Form Title and any other optional fields.
Form Instructions: Block of text used to explain the purpose of the Form and any directions on filling it out.
Complete Message: Message that displays after the Form is completed and submitted. This only displays for standalone Forms on the Portal.
Congregation: The congregation or parish associated with the Form record.
Primary Contact: The primary individual to be contacted about the Form.
Response Message: Indicates a Template record to use to send a response to each respondent (via a routine every 15 minutes). This only applies to standalone Forms.
Get Contact Info: When selected, the Form requires users to provide their contact information. This only applies to standalone Forms.
Get Address Info: When selected, the Form requires users to provide an address. This only applies to standalone Forms.
Notify: When selected, the Primary Contact is notified of Form Responses. This requires the "Form Response Submitted - Forms" process to be active and configured properly.
Under Form Questions, drag the desired Form Field type from the Question List on the left into the middle Form preview. Form Field types include:
Instructions
Small text box
Large text box
Date (A sample date displays in the tool, but a date picker will display on the Form itself.)
Drop-down list
Radio Buttons (Vertical and Horizontal)
Checkbox
File Upload
With the question selected, edit the Question Properties on the right:
Name the field using the Question label.Important: No two fields on the Form can have the same name. If a fields are given the same name, you're warned upon saving and the fields will be identified.
Select the Hidden box, if applicable, to hide this question for future respondents.
Select the Required box, if applicable, to make this a required question.
Select the Placement box, if applicable, to make this a question that requires follow up.
If your field label is long, use the Alternate label. Anything in this field replaces the field label. Note: The Alternate label comfortably holds 825 characters; anything longer will be cut off and/or overlap the text box.
Under Add Options, edit the option you want to display for this question. For radio buttons and drop-down lists, you can click Add value and add options as needed. (See this article for more information on the form fields.)
If another question should only display if a certain option is selected, you can add conditional logic. Click the "chain link" button beside the relevant option, and select the question that depends on this answer. For example, you may have the questions, "Do you want a t-shirt?" and "What size t-shirt do you wear?". The second question should only display if the answer to the first question is "Yes". So, beside the "Yes" option, you would click the button and select the "What size..." question. (See this article for more information on conditional logic.)
Repeat this as needed to add all the questions you need to your Form.
To change the question order, drag questions to the desired place in the middle Form preview.
Click Save. The tool refreshes to allow you to search again, and repeat these steps as needed.
Click Close.
When autocomplete results are available use up and down arrows to review and enter to select.