![]() Widgets
can be added to a website with very little coding knowledge, but Widgets do live on websites! You will probably need to work closely with your web staff/team/vendor to successfully integrate Widgets into your existing website ecosystem.
Widgets
can be added to a website with very little coding knowledge, but Widgets do live on websites! You will probably need to work closely with your web staff/team/vendor to successfully integrate Widgets into your existing website ecosystem.
Be sure to check out Specific CMS Tips for your Content Management System. And, for a peek at real-time Widget setup, check out the Widget Track of the 2022 MinistrySmart Conference.
You can configure Widgets on your website by completing these steps on Shared Configuration (script and permitted URLs), and then check out the steps for configuring each specific Widget (code snippet and attributes).
Excited to see it in action? We've got you covered! Just skip ahead and watch the Adding Your First Widget to Your Website video. Then come back and read all about it.
1. Set Permitted URLs
Any website where a Widget is placed must be included in your "permitted URLs" list. Simply contact Support to add, change, or remove permitted URLs.
Looking for more details? See Enabling Widgets for an in-depth description.
2. Enable Widgets on Your Website
All widgets are powered by a shared script that needs to be added to any page where you want to use a Widget. Tip: If you add the shared script to your website header, widgets will be available on all pages.
Add the shared script in three steps:
<script id="MPWidgets" src="https://{your platform domain}/widgets/dist/MPWidgets.js"></script>3. Identify (or Create) Your Webpage
Widgets live on websites, so figure out where they should appear. Some widgets are foundational (for example, Login and Languages & Locale). It would be helpful to have these on every page. Other widgets will live on a specific page. In the example below, we'll put the Event Finder widget on an Events page.
4. Configure Your Widget
While some widgets allow for optional elements, like filtering by attributes or a URL, you can get a widget up and running with the same basic steps: add, configure, and review.
Review and configure the other options for this widget.
<mpp-event-finder targeturl="https://{your website domain}/event-details"></mpp-event-finder>
Want to know more about customizing your Event Finder widget? See Configuring Event Finder Widget for more about filtering by attributes and URLs.
5. Configure Your Platform Records
Now that your widget is happily living on its webpage (yay!), take some time to make sure it's accurate. Each widget will need its own Platform configuration, but for our Event Finder example, it's useful to filter by Congregation and/or Ministry. Want users to be able to filter by campus? Make sure the desired Congregations have the Available Online field set to "True." Want to allow filtering by Ministry? Set the Available Online field to "True" for the desired Ministries.
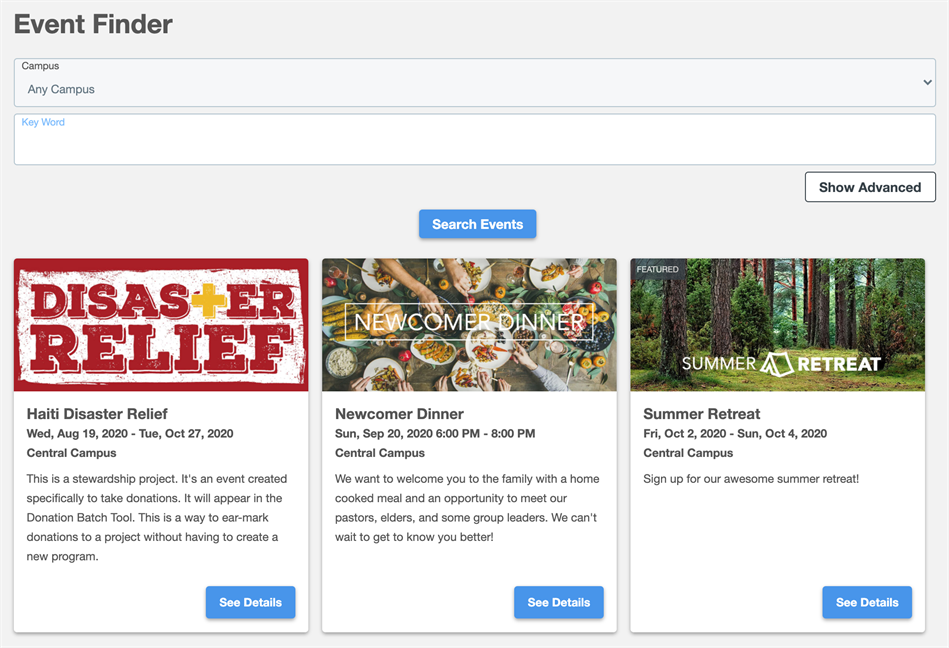
The information displayed on your widget comes directly from the Platform. Make sure the relevant Platform records are correct and up-to-date (names, titles, dates, descriptions, etc.). For our Event Finder example, make sure the start and end dates are correct (and within the next 120 days), that the visibility allows the event to be viewed online, and that it has been approved. Attaching a compelling image to your Event will significantly up the widget wow-factor.
Check back later this fall for a video talk-through on setting up Finder + Detail Widget pairs!
