You may work with a 3rd party to collect donations. If the result of your process is a CSV file, you can import those donations into MinistryPlatform using the Batch Manager Tool! But first, make sure your CSV file is formatted correctly for a smooth
and successful import.
Process Overview
Here's what you'll do:
- Save the CSV file in your 3rd party solution, noting all transactions that need to be imported into MP.
- Edit the CSV file to match the format that MP requires.
- Use the Batch Manager Tool to import and finalize your batch.
Important: The Batch Manager Tool will allow you to import more than 1000 records at a time. But the tool will only show you 1000 records at a time. And because the balance is tabulated based on the displayed records,
not the imported records, your calculations will be incorrect. Be sure to limit your imports to 1000 records or fewer.
Editing Your CSV File
- Open the saved CSV file in your favorite CSV editor, such as Excel or Google Sheets.
- If your file includes a header row that describes the data in each column, remove it.
- Insert a row at the top, and enter the following:
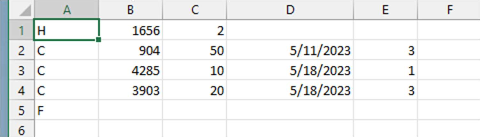
- In row 1 column A, enter "H".
- In row 1 column B, enter "1656".
- In row 1 column C, enter "2".
- Rearrange your data columns to match the following:
- Column A should list the payment type.
- Column B should list the donor number or envelope number.
- Column C should list the donation amount.
- Column D should list the date donations were paid.
- Column E should list the account number found in Program records.
- For all transaction rows, enter "C" in column A (and make sure it's capitalized). This stands for charge/credit card.
- In the last, below your final transaction row, enter "F" in column A. All columns after this should be empty.
- Ensure that there are no dollar signs on any amounts, and that your dates are formatted as M/DD/YYYY.
Results: After you complete steps 3 & 4, your file should look similar to this:
- Save your CSV file.
Importing and Finalizing Your Batch
- In MinistryPlatform, click the bookmarks icon at the top, and select Batch Manager.
The BMT will display in a new browser tab. - Click Batch, and select Import.
- Drag-and-drop your formatted CSV file into the window.
If your file is formatted correctly, the data from your CSV file will display. - Select the checkbox for the batch you want to import.
- Confirm the Default Campus (Congregation/Parish), Default Program, and Payment Type are correct.
- If your import file contains multiple Congregations/Parishes, select the option.
- Click Save Selected Batches.
Note: It may take a few moments to import the batch.
- When the import is finished, click Open.
- Confirm all the data from your file was imported.
- If needed:
- Correct any transactions that are not displaying in green.
- Add any additional transactions.
- Once all transactions display in green, you are ready to finalize the batch! Click Batch, and select Finalize.
- Click Finalize to confirm.
